As a Procreate user, one of the most crucial tools for creating impressive digital art is the eraser. With the right eraser at your disposal, you can achieve clean lines, crisp edges, and seamless transitions between colors. In this article, we will explore the best erasers in Procreate through a selection of informative YouTube videos that can help artists maximize their potential on the app.
1. Top 5 Procreate Brushes for Erasing and Detailing

In this video by James Julier Art Tutorials, you will discover the artist’s personal top 5 brushes for erasing and detailing within Procreate. James demonstrates how each brush performs and provides valuable insights into the pros and cons of each one. This video is a go-to resource for artists looking to improve their Procreate toolkit and enhance their digital art creations.
The video is not only informative but also engaging, thanks to James’ clear and concise explanations of each brush and its function in the Procreate app. The brushes showcased in this video are versatile, making them suitable for various artistic styles and purposes.
James Julier Art Tutorials’ channel can be found at the following URL: http://www.youtube.com/@JamesJulier-Artist.
Common Mistakes and How to Avoid Them:
- Not experimenting with different erasers: Each eraser brush offers a unique set of features and capabilities. Try various brushes to find the one that best suits your needs and artistic style.
- Not adjusting the brush size and opacity: Depending on the desired effect, altering the size and opacity of the eraser brush can lead to better results in your artwork.
- Not utilizing the eraser to create texture: Some erasers can create interesting textures and effects when used with a light touch or varying opacities. Don’t be afraid to explore this creative aspect of the eraser tool in Procreate.
2. 100 Procreate Tips in 15 Minutes, Including Eraser Tricks
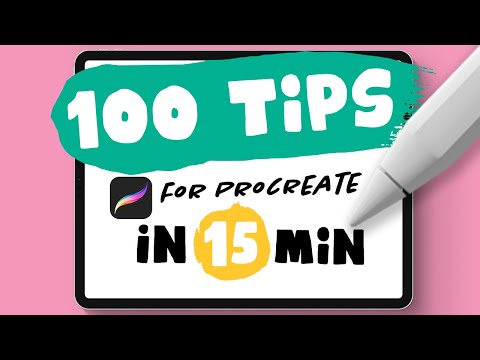
In this comprehensive video by Art with Flo, you will learn 100 Procreate tips, including specific eraser tricks, in just 15 minutes. The video speedily covers an array of topics, such as creating shortcuts, getting the most out of brushes, and transforming your artwork into a masterpiece.
Art with Flo’s easy-to-follow explanations and extensive list of tips make this video a must-watch for both beginners and experienced Procreate users. You are guaranteed to learn something new from this tutorial, no
matter your current skill level. With these handy tips, you’ll be able to increase your productivity and create even more amazing art.
Check out more of Art with Flo’s tutorials and resources on their channel: http://www.youtube.com/@ArtwithFlo.
Common Mistakes and How to Avoid Them:
- Not using keyboard shortcuts: To save time and improve efficiency, familiarize yourself with Procreate’s shortcuts, which can help you switch between tools or make adjustments quicker.
- Sticking to default settings: Don’t be afraid to experiment with brush and eraser adjustments. You can create custom brushes or modify existing ones to better fit your work style and artistic needs.
- Not backing up your work: Ensure that your artwork is safely backed up, preventing the loss of progress due to errors or crashes.
3. How to Create Clean Edges in Procreate Using the Eraser

Artist Dave Reed reveals how the eraser tool in Procreate is essentially an invisible brush in this insightful video. He demonstrates how to use the snapping feature to create sharp lines and perfect edges with the eraser in your digital art. The video also covers the use of BUTTERBLADE brush, available for download on Dave’s website.
Dave Reed’s step-by-step guide to creating clean edges is both practical and easy to understand, making it an excellent resource for artists on Procreate. The video provides valuable information on optimizing the eraser tool for stunning results.
You can find more helpful videos from Dave Reed by visiting his channel: http://www.youtube.com/@drugfreedave.
Common Mistakes and How to Avoid Them:
- Not utilizing snapping or quick shape features: These tools can simplify the creation of precise shapes and clean edges in your digital art.
- Erasing too aggressively: For a smoother, cleaner effect, practice using various pressures and opacities when erasing.
- Not using precise brushes for erasing: Some brushes create a sharper edge in your erasing, which may be necessary for certain styles or elements within your artwork.
4. Best Digital Art Wins $5,000 – ZHC Crafts Digital Art Challenge

This exciting digital art competition hosted by ZHC Crafts puts an interesting twist on how erasers can be used in Procreate. Participating artists compete against one another to create the best digital artwork under time constraints and a tempting prize at stake.
Although ZHC Crafts’ video is
more entertainment-oriented, it is still a valuable resource for those looking to push their creativity with the eraser tool. As each artist has their unique approach to using the eraser, you might come across new techniques and ideas worth trying out in your work.
To enjoy more content from ZHC Crafts, visit their channel: http://www.youtube.com/@zhccrafts.
Common Mistakes and How to Avoid Them:
- Not being open to experimentation: Working under time constraints may spark creativity and innovative use of the tools at your disposal, such as the eraser.
- Relying solely on one technique: Observe and learn from other artists to diversify your skillset and improve your overall understanding of the eraser tool in Procreate.
- Not challenging yourself: Participate in competitions or take on projects that push the boundaries of your current abilities to grow as an artist and master new techniques.
5. Erase to Reveal Multiple Layers in Procreate with TikTok Art Style

This TikTok-inspired tutorial by Let’s Draw with BeeJayDeL offers a unique approach to using the eraser in Procreate. The video teaches you how to create a stunning “erase to reveal” effect using multiple layers, perfect for sharing eye-catching content on TikTok or Instagram Reels.
While this technique may seem complex at first glance, BeeJayDeL does an excellent job of breaking down the process into simple, manageable steps. By following the tutorial, you’ll be able to create dynamic digital art pieces that not only flex your Procreate skills but also engage your social media audience.
Discover more tutorials and resources on Let’s Draw with BeeJayDeL’s channel: http://www.youtube.com/@BeeJayDeL.
Common Mistakes and How to Avoid Them:
- Not paying attention to layer hierarchy: When working with multiple layers for an erase to reveal effect, ensure your layers are properly ordered to prevent undesired outcomes.
- Ignoring opacity settings: Experiment with different opacity levels in both your artwork and eraser tools to achieve the desired reveal effect.
- Not optimizing work for social media platforms: If sharing your art on social media, consider the constraints and needs of your chosen platform, such as video lengths, aspect ratios, and compression.
Conclusion
Mastering the use of erasers in Procreate can greatly enhance your digital artwork. These videos provide invaluable guidance, inspiration, and techniques for making the most of the eraser tool. Whether you’re a beginner or a seasoned Procreate user, expanding your knowledge and toolkit is crucial to elevating your art to new heights. Happy creating!