As an artist, you might often work with multiple design applications like Procreate and Adobe Illustrator. But can Procreate open AI files directly? Unfortunately, no. However, there is a way to convert your Procreate drawings into vector graphics using Adobe Illustrator and import them back into Procreate. In this article, we will present a selection of helpful YouTube videos that will guide you through the process step-by-step.
Convert Procreate Drawing to VECTOR in ILLUSTRATOR by Amillustrated

In this video tutorial, Amillustrated provides an easy-to-follow process for converting your Procreate drawings into vector graphics in Adobe Illustrator. The author demonstrates how to properly export your drawing from Procreate, import it into Illustrator, and then convert the artwork into a vector format using various tools available in Illustrator. With a clear explanation and practical tips, this video is a great starting point for anyone looking to convert their Procreate drawings into vector graphics.
Amillustrated covers essential aspects like cleaning up your artwork, working with paths, and using color swatches to make your vector conversion process smoother. By following the steps outlined in the video, you can easily convert your Procreate drawings into fully scalable vector graphics that can be used in Illustrator or imported back into Procreate for further editing.
For more tutorials and content from the author Amillustrated, visit their YouTube channel.
How I turn My Procreate Drawings Into Vector Graphics Using Adobe Illustrator by Charley Pangus
Charley Pangus’ video provides a detailed, step-by-step guide on turning Procreate drawings into vector graphics using Adobe Illustrator. In this tutorial, Charley shares his personal techniques for importing Procreate sketches into Illustrator and using the program’s tools to create clean, polished vector graphics. He also highlights important features such as the Image Trace function in Illustrator.
This video offers a comprehensive look at the entire process, from exporting the Procreate file to refining the final vector artwork in Illustrator. Charley’s tutorial emphasizes the importance of attention to detail when creating vector graphics, ensuring that your final artwork is smooth, precise, and fully editable.
You can find more tips and tutorials from Charley Pangus on his YouTube channel.
Export multiple layers from Adobe Illustrator for iPad into Procreate by Authors and Illustrators

In this video by Authors and Illustrators, the author showcases the process of exporting multiple layers from Adobe Illustrator for iPad into Procreate. The tutorial offers a step-by-step explanation of how to export each layer separately and then import them as separate layers in Procreate.
By demonstrating various techniques such as grouping and duplicating layers and navigating the export settings, this video serves as an excellent guide for artists looking to work seamlessly between Illustrator and Procreate. The author also offers suggestions on how you can use the imported layers creatively in Procreate to get the best results.
For more tutorials and content from Authors and Illustrators, visit their YouTube channel.
How to move Procreate files to Adobe Photoshop or Illustrator by Scott Banks

Scott Banks’ video tutorial focuses on moving Procreate files from your iPad to Adobe Photoshop or Illustrator while preserving the layers. He explains the process in a few simple steps, making it easy even for beginners to follow along. This video helps artists who want to continue working on their Procreate art in Adobe programs while retaining the original layer structure of their artwork.
In the tutorial, Scott covers vital aspects like exporting files with multiple layers and importing them into Photoshop and Illustrator. With clear instructions and helpful visuals, you’ll be able to transfer your Procreate files to these other software without any hassle, allowing you to enhance and edit your artwork smoothly.
For more videos and content from Scott Banks, check out his YouTube channel.
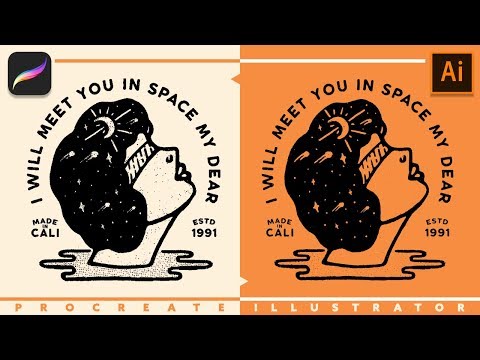
How to Turn PROCREATE DRAWING to VECTOR in ADOBE ILLUSTRATOR by Chez Núñez

In this video, Anna from Chez Núñez demonstrates her process for turning Procreate drawings into vector graphics using Adobe Illustrator. Anna provides a step-by-step guide on how to export your drawing from Procreate and then import it into Illustrator for vectorization. She shares useful tips to make the process more efficient and presents real-life examples of her artwork to better illustrate the steps.
Anna’s tutorial is concise and informative, offering viewers a simple way to transform their Procreate drawings into clean, scalable vector graphics. By following her guidance and techniques, you’ll have an improved understanding of the conversion process and create beautiful vector art from your Procreate sketches.
Discover more tutorials and content from Anna on the Chez Núñez YouTube channel.
Common Mistakes and How to Avoid Them
While working with Procreate and Adobe Illustrator, artists may encounter some common mistakes. Here are a few tips on how to avoid them:
- Don’t rush the cleanup process in Illustrator. Pay attention to details and ensure your paths are smooth and accurate.
- While exporting files from Procreate, make sure you choose the right file format compatible with Illustrator (such as PSD).
- When using Image Trace in Illustrator, choose the appropriate settings to get the best result. Adjust the threshold value and experiment with different options to find what works best for your artwork.
- During the conversion process, pay attention to the layer organization. Keep the layers well-structured and named to avoid confusion when importing them into Adobe programs.
Conclusion
Although Procreate doesn’t directly open AI files, with the help of these video tutorials and a few simple steps, artists can smoothly convert their Procreate drawings into vector graphics using Adobe Illustrator. This process enables you to achieve greater flexibility and scalability in your artwork, as well as seamlessly switch between multiple design applications. Just remember to watch out for common mistakes and follow the tips provided to ensure a smooth and efficient workflow.